Lighting & environment
The system will identify the markers in near darkness. However, you will get better performance from the camera if you take a bit of care with the environmental setup.
Quality indicators
The Quality Indicators are a small on-screen display allowing you to quickly identify any problems with the fit area.
Quality Indicators appear next to the preview from the Kinect camera, in Step 1: Configuration:
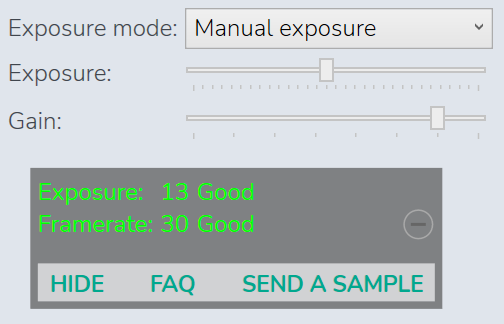
If you click on the plus button, the quality indicators will expand to give the numeric value for each indicator, and some additional options:
The quality indicators also appear in Step 2: Capture, with an additional indicator "Detection":
Exposure
The exposure is how many milliseconds the aperture of the camera stays open to capture each frame.
Generally, you want the aperture to be open as short as possible, to minimise motion blur in videos and still images. But if the aperture needs to be open for long enough to capture enough light to make a good picture of the scene for each frame.
We want to get 30 frames per second from the camera, which means that the exposure should be less than 33ms. (33ms per frame x 30 frames per second = 1 second)
The Kinect camera has a built-in auto-exposure method. It works approximately as follows:
- If the lighting is good enough to produce an image with good white balance at 30fps, then do that
- If the lighting isn't good enough for that, drop down to 15fps
- If the lighting is really bad, drop down lower than 15fps
Sometimes, if we have imperfect lighting conditions or a pure-white or pure-black background, the Kinect camera won't do 30fps even though it looks like it should. In that case, we can override the Kinect camera's built-in auto-exposure function, and set exposure manually.
Just click the "Exposure mode" drop-down, and select "Manual Exposure":

You will then see two additional controls:
- an Exposure slider, allowing you to set the exposure manually from 1ms to 30ms.
- a Gain slider, allowing you to set the gain (brightness)
Note that when using manual exposure controls, the image will sometimes look "flickery" under certain lighting conditions, depending on the frequency of your power source. You can vary the exposure slightly to reduce the flickering.
Lighting tips
- Ideally you want the light to be evenly diffused, i.e. consistently spread in the space. Having bright spots on the rider or background doesn’t improve the score.
- A light background helps by ensuring that light is reflected around the space, rather than being absorbed
- Indirect natural lighting (e.g. from a window) is great
Lighting products
If you need to add artificial lighting to your scene, here are some products that other fitters have used successfully:
- Nanoleaf Strip produces around 2200 lumens, which is bright for an LED strip. One or more of these lighting up your fit studio is an inexpensive and interesting-looking way to add lighting.
- "Garage lights" on Amazon like this one are very bright, and because they fit a standard light socked, they can be used with a light bulb stand which can be attached to a tripod.
Framerate
The framerate indicates how many frames Velogic Studio is able to take from the Kinect and process per second. If you are only getting 15/16fps, it's likely that the Kinect auto-exposure method is reducing the FPS of the Kinect camera. See the Exposure section above.
Detection
Detection shows whether the system is consistently finding exactly 7 markers.
Still having problems?
Check out our troubleshooting guide if you’re having problems getting a good result with the Quality Indicators.
Related Articles
Configuring Orbbec Femto Mega camera
During the installation session, our technician will have installed the Velogic FrameBlaster software onto your Orbbec Femto Mega camera, and added the camera to Velogic Studio. Step 1 of Velogic Studio will show a card for the camera, and you can ...Troubleshooting Velogic Studio
If you can’t get any information at all from the Kinect, or the Kinect is disconnecting: check out our hardware compatibility guide and Kinect camera troubleshooting guide first. Once you're sure that the Kinect is working fine (i.e. the Kinect ...Aero basics
At higher cycling speeds, a significant portion of a rider's power is expended in overcoming aerodynamic drag (Martin et al. 1998). As speed increases, wind resistance grows exponentially, meaning a small increase in speed requires disproportionately ...